1. Local Virtual Machine
This workshop will take you through deploying a Virtual Machine with VirtualBox. It will show you how you can use Virtual Machines to develop on specific operating systems and a mimic of the hardware. For example, develop an IoT application before deploying the application to the IoT device.
VirtualBox
Oracle VM VirtualBox is a cross-platform virtualization application. What does that mean? For one thing, it installs on your existing Intel or AMD-based computers, whether they are running Windows, Mac OS X, or Linux operating systems (OSes). Secondly, it extends the capabilities of your existing computer so that it can run multiple OSes, inside multiple virtual machines, at the same time. As an example, you can run Windows and Linux on your Mac, run Windows Server 2016 on your Linux server, run Linux on your Windows PC, and so on, all alongside your existing applications. You can install and run as many virtual machines as you like. The only practical limits are disk space and memory.
When you start VirtualBox for the first time, a window like the following is displayed:
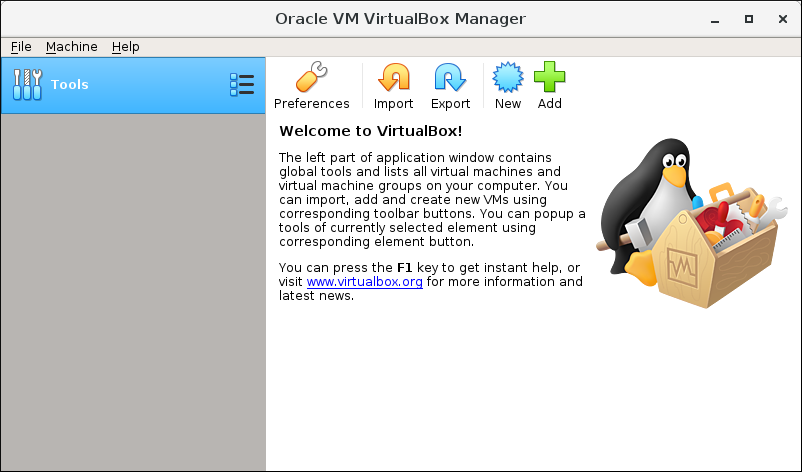
This window is called the VirtualBox Manager. The left pane, which is currently empty, lists all your VMs. The right pane will display the properties of the selected VM.
Virtual Raspberry Pi
What is a Raspberry Pi?
You are going to create a virtual Raspberry Pi. The Raspberry Pi is a low cost, credit-card sized computer. It’s capable of doing everything you’d expect a desktop computer to do, from browsing the internet and playing high-definition video, to making spreadsheets, word-processing, and playing games.
What’s more, the Raspberry Pi has the ability to interact with the outside world, and has been used in a wide array of digital maker projects, from music machines and parent detectors to weather stations and tweeting birdhouses with infra-red cameras.
Creating a Virtual Raspberry Pi
Click “New” in the VirtualBox top menu, you should now see a screen like this:
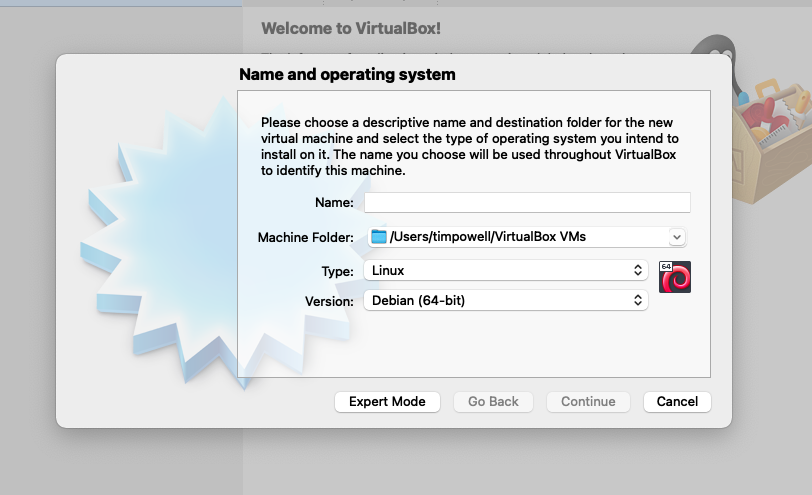
Choose the name and select the destination folder (default is fine) for your Raspberry Pi VM.
As the Raspberry Pi operating system is derived from Debian OS, please change type to: Linux and version to Debian (64-bit).
On the next page, you can select the amount of RAM to assign to your Raspberry Pi, the recommended 1024 MB is suitable.
The next page allows you to customise the amount of hard disk space to assign to your Raspberry Pi, the recommended 8 GB is suitable. Continue through accepting the defaults until your virtual machine is created.
At this point you may be wondering how the virtual machine is going to become a Raspberry Pi as you have not yet given it an operating system. So far, you have provisioned the configuration, now you need to install the operating system.
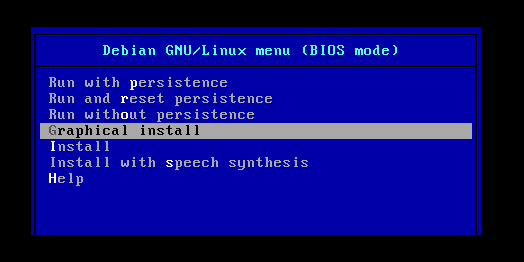
In the VirtualBox Manager, select your newly created VM, and press Start. You will then be able to navigate to where you downloaded the Raspberry Pi Desktop ISO.
Scroll down with the arrow keys to Graphical Install and press enter. Follow the instructions on screen to install the Raspberry Pi OS.
This is a good opportunity to make a brew as it will take a few minutes.
After a while, the installation wizard will prompt you: “Install the GRYB boot loader to the master boot record?” Select Yes, and choose /dev/sda.
When the installation is finished, you have successfully created a virtual Raspberry Pi on your local machine!
Enable Full Screen
With your Raspberry Pi VM running, go to the Devices menu at the top of the screen, choose Insert Guest Additions CD image…. You will see a pop-up saying “Removable medium is inserted”, press Cancel. At the top of your screen in the VM, select the dark square with “>_” in it, this is the terminal logo, and type the following:
sudo sh /media/cdrom0/VBoxLinuxAdditions.run
sudo reboot
After rebooting, open a new terminal, and use the following command:
lxrandr
Choose your preferred resolution, I recommend 1920x1200.
Finally, you should also enable copy and paste. Shut your VM down and return to the VirtualBox window. Select your VM and select Settings. In the “General” tab, select “Advanced”. Change the “Shared Clipboard:” setting to “Bidirectional”. Save and start your VM.
VirtualBox Doesn’t Like To Share
VirtualBox currently has a bug which doesn’t allow shared clipboard on MacOS Big Sur. If you wish to copy into your VM please use an online clipboard such as https://cl1p.net/.
Making a virtual IoT Weather Station
Now that you have created your virtual Raspberry Pi, it is time to use it to develop your very own weather station.
In order to make the weather station, you will need the input from relevant weather sensors. The Sense Hat is a popular add-on for the Raspberry Pi that comes with a large abundance of sensors. Fortunately, the Raspberry Pi Desktop OS you have installed comes with a Sense Hat Emulator pre-installed. To open the Sense Hat Emulator, click the Raspberry Pi icon in the top left, go to Programming, and click on Sense HAT Emulator.
To make the weather station, you will be using Python. Again, Python comes pre-installed on a Raspberry Pi.
First, let’s update and install all the necessary packages.
sudo apt -y update
sudo apt -y upgrade
Testing the Sense Hat
Now, let’s write some Python code to test the Sense Hat Emulator. You will write a simple Python program that will display ‘Hello World’ on the Sense Hat’s LEDs. To do this you will a pre-installed integrated development environment (IDE) called Thonny Python IDE.
cd
touch sensehat_test.py
thonny sensehat_test.py
Then type or paste the following into sensehat_test.py:
from sense_emu import SenseHat

sense = SenseHat()
sense.show_message("Hello World")
To save and run the file, press the Save button at the top of the Thonny IDE window, followed by the Run button. You will see the Sense HAT Emulator open and start to display ‘Hello World’ on the LED panel.
Weather Station
Now that you have tested that the Sense Hat Emulator is working correctly, you can write the Python weather station script.
touch weather_station.py
thonny weather_station.py
Then type or paste the following:
#!/usr/bin/python
from sense_emu import SenseHat
import time
import sys

sense = SenseHat()
sense.clear()

try:
    while True:
        temp = sense.get_temperature()
        temp = round(temp, 1)
        print("Temperature C: ", temp)

        humidity = sense.get_humidity()
        humidity = round(humidity, 1)
        print("Humidity: ", humidity)

        pressure = sense.get_pressure()
        pressure = round(pressure, 1)
        print("Pressure: ", pressure)

        time.sleep(1)
except KeyboardInterrupt:
    pass
To save and run the file, press the Save button at the top of the Thonny IDE window, followed by the Run button.
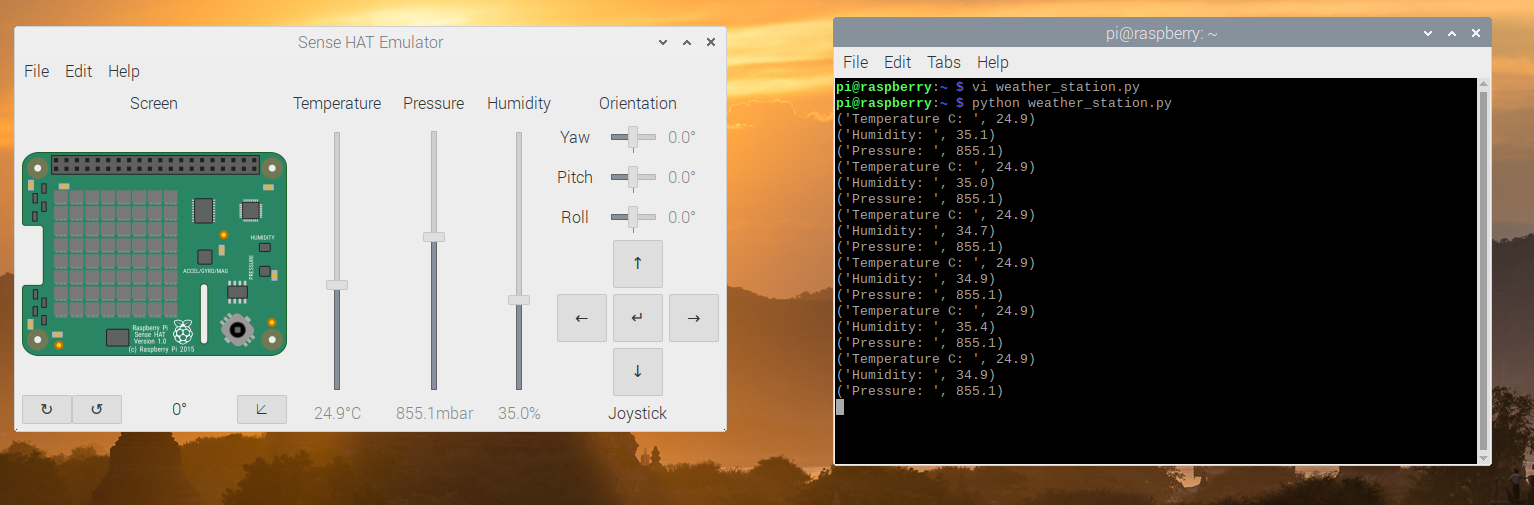
You should now see something similar to the image below. Try changing the Temperature, Pressure, and Humidity on the Sense Hat Emulator. Notice how the output is changing?
Now you have created your weather monitoring app, it is time to visualise the data in a more useful format. To do this you will utilise a free account with Initial State, an IoT Platform for Data Visualisations. To get started, on your local computer, head over to https://www.initialstate.com/ and click SIGN IN in the top right hand corner. Once you have registered for an account and logged in, you will see a page similar to this:
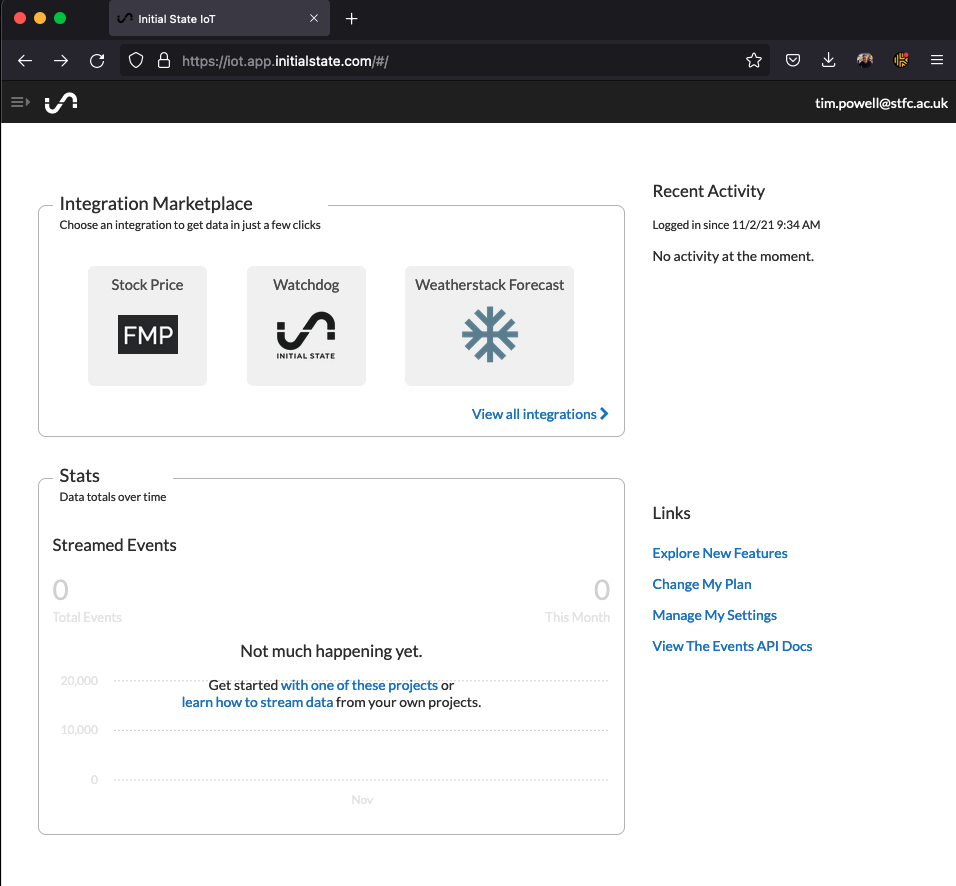
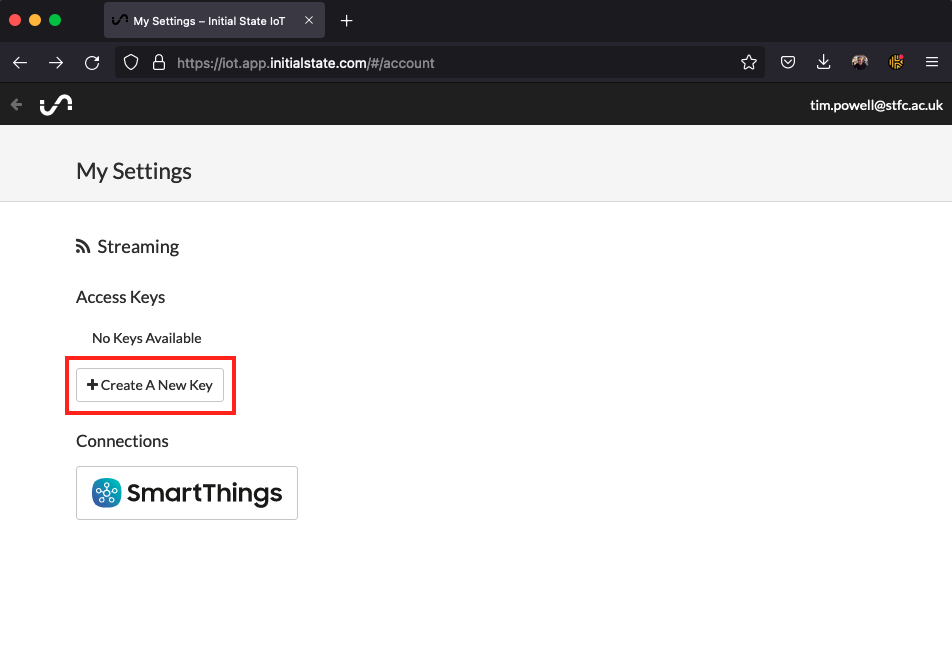
Now that you have your account, you need to create a Streaming Access Key, click your email address in the top left corner and select my settings. On the Settings page, click + Create A New Key and make a note of this key, you will be using it later.
Heading back over to your Raspberry Pi VM, you will need install the relevant software to enable data streaming. In the terminal run the following:
pip3 install ISStreamer
curl -ssl https://get.initialstate.com/python -o - | sudo bash
When prompted if you wish to download the example code, press N. You now have the relevant software installed, you need to edit your weather_station.py program to stream the data. The entire script is below, remember you have already written most of this so just make the necessary changes. Don’t forget to put your access key value that you created with Initial State in the script.
#!/usr/bin/python
from sense_emu import SenseHat
import time
import sys
from ISStreamer.Streamer import Streamer

sense = SenseHat()
logger = Streamer(bucket_name="Sense Hat Sensor Data", access_key="YOUR_KEY_HERE")
sense.clear()

try:
      while True:
        temp = sense.get_temperature()
        temp = round(temp, 1)
        logger.log("Temperature C",temp)

        humidity = sense.get_humidity()
        humidity = round(humidity, 1)
        logger.log("Humidity :",humidity)

        pressure = sense.get_pressure()
        pressure = round(pressure, 1)
        logger.log("Pressure:",pressure)

        time.sleep(1)
except KeyboardInterrupt:
      pass
To save and run the file, press the Save button at the top of the Thonny IDE window, followed by the Run button.
Back on your local computer, head back to Initial State and click the 3 lines in the top left corner of the webpage.
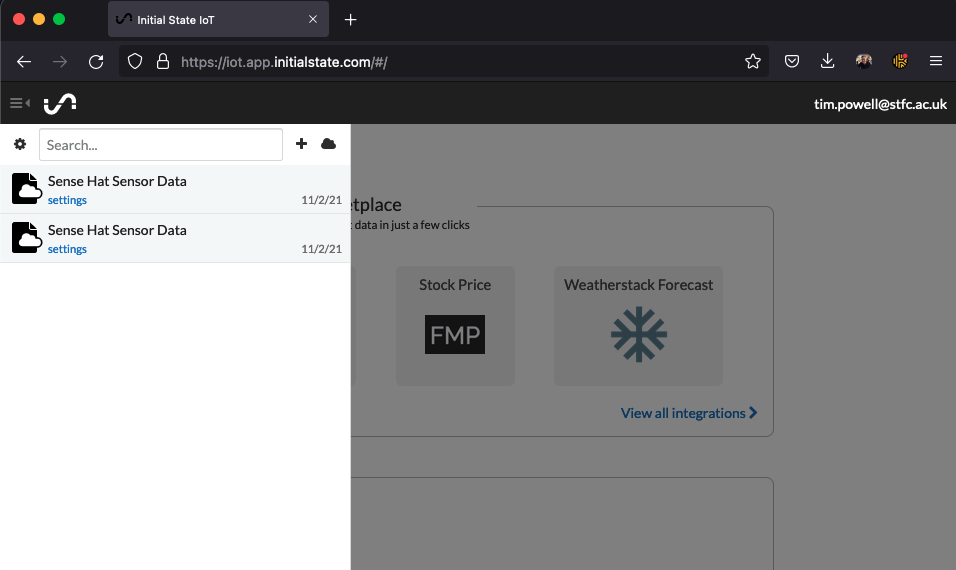
Click on your app to see your data streaming!
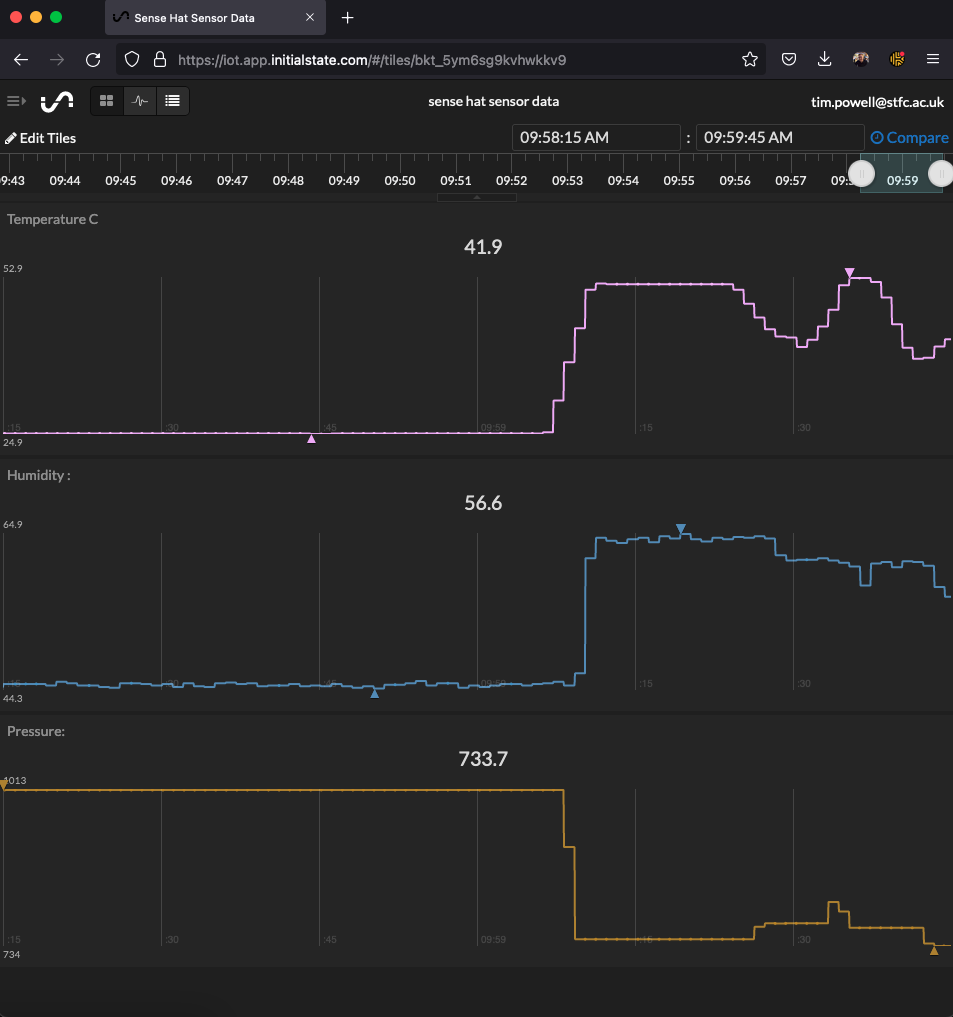
This is a small and quick example of how it is possible to develop software for an IoT device on your laptop. You don’t need to purchase the Raspberry Pi or Sense HAT hardware for the purposes of development.