2. Building & Deploying a Container
This workshop will take you through using Docker and Docker Desktop. It will give you hands-on experience with building and deploying your own apps.
Docker Environment
For this tutorial, you will use Play with Docker. Play with Docker provides a command line terminal in your browser which is running on a very lightweight cloud VM. Using Play with Docker for this course helps to avoid installation permissions issues, if you are actively developing with Docker then this is not a suitable solution.
If you already have Docker installed on your computer and you are comfortable using it, feel free to do the following session locally.
If you are comfortable on the command line and wish to install Docker locally, please follow these instructions to install Docker:
To test your Docker installation, run the following in a bash terminal:
docker run hello-world
If you have any issues at this point please raise them.
We are going to be covering a few commands for Docker, there are far too many to go into on this course. For a quick run down on the most popular commands, check out this cheat sheet.
Docker
A quick reminder on Docker…
Docker is probably the most well known containerisation tool. It allows developers, sys-admins, etc. to easily deploy their applications in a container to run on the host operating system.
Remember that the key benefit of containers is that it allows users to package an application with all of its dependencies into a standardised unit that can be deployed on multiple different hardware and operating systems without the need to rebuild the software. Also, as was discussed earlier in the day, containers do not have a high overhead and are often a fraction of the size compared to virtual machines.
Hello World
Playing with Busybox
In this section you are going to be using a BusyBox container and exploring some everyday Docker commands. BusyBox is a software suite that provides several Unix utilities in a single executable file. It has been described as “The Swiss Army knife of Embedded Linux”.
To get started, you need to get the BusyBox image, using the pull command you can fetch images from the Docker registry and save it to your system.
docker pull busybox
To list all images that are currently on your system, use:
docker images
Unless you have already done development with Docker in the past you should see 2 images: hello-world and busybox.
Now that you have the BusyBox image saved locally on your system, the next step is to run a Docker container based on this image. To do this, you are going to use probably the most used Docker command; docker run.
docker run busybox
Nothing happened… Don’t worry that isn’t a bug! When you call run, the Docker client finds the image, loads up the container, and runs a command in the container. As no command was given, the container booted up, ran an empty command, and exited. Try running:
docker run busybox echo "Hello from BusyBox"
As you can see, the command echo "Hello from BusyBox" was executed. This is a simple example of running a command, but imagine spinning up a virtual machine, running the command, and then quitting the VM. Clearly, going down the container route is substantially quicker.
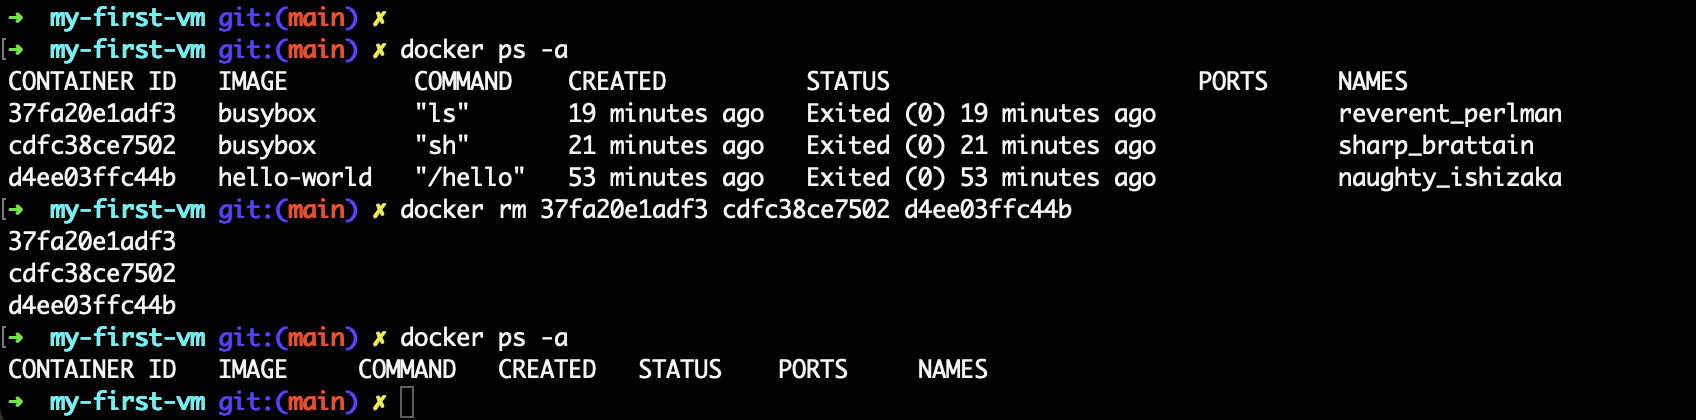
Another useful Docker command is docker ps. This command shows you all the containers that are currently running. An extension to this is docker ps -a, adding the -a shows you a list of containers that are running, or that have run; note the STATUS column. Try these commands now. Alternatively, if you have Docker Desktop, you can use the user interface to view your container statuses.
docker ps
docker ps -a
Running a single command may not always be useful, it is often the case that a developer wishes to run as many commands in the container as they want. In order to do this, you need to run the image in interactive mode:
docker run -it busybox sh
You now have an interactive session open with BusyBox. Create a new file using the touch command (ls lists the current files and directories):
ls
touch <FILENAME>
ls
Now exit the BusyBox container by typing exit. If you launch another interactive session you will notice that the file created is no longer there. This is because Docker creates a new container every time.
The final note to touch on in this introduction is house cleaning. Running docker run multiple times will create and leave a lot of containers that will eat up disk space. The docker rm command can be used to remove dangling containers, simply paste the container IDs of the containers you wish to remove alongside the command (remember, you can use docker ps -a to get a list of containers created and their container IDs). Rather than copy and paste lots of container IDs, Docker makes it easy to remove all stopped containers with docker container prune. Alternatively, if you have Docker Desktop, you can use the user interface to select a delete containers.
What other images are there?
There are literally millions of images publicly and freely available on DockerHub alone. DockerHub is a service provided by Docker for finding and sharing container images. It is the worlds largest repository of public container images with an array of content sources including official developers, community developers, open source projects, and independent software vendors.
For the next section of the course you will need a DockerHub account. It is free to sign up, head over to DockerHub now and sign up and have an explore.
My First web app
It is now time to create your own container image! You are going to create an image that sandboxes a small Flask application that provides a random cat gif.
The first order of business is to create the Python Flask web app before dockerizing it by writing a Dockerfile.
Create your web app
The web app you are going to create is a Python Flask app that will display a random cat gif every time it is loaded. We start by creating a new directory and populate it with the necessary files.
mkdir myfirstwebapp
mkdir myfirstwebapp/templates
cd myfirstwebapp
touch app.py requirements.txt templates/index.html Dockerfile
You will now need to populate the files with the relevant code, to do this you will use a command line text editor called Vim. To edit app.py with Vim:
vi app.py
Press i to enter ‘INSERT’ mode. Then type or paste the following into app.py:
from flask import Flask, render_template
import random

app = Flask(__name__)

# list of cat images
images = [
    "https://c.tenor.com/gIaioChTOloAAAAC/cat-cute.gif",
    "https://c.tenor.com/GTcT7HODLRgAAAAC/smiling-cat-creepy-cat.gif",
    "https://c.tenor.com/M9xqrmAzMzIAAAAC/smile-cat.gif",
    "https://c.tenor.com/_kqZQY5wX2sAAAAd/orange-cat-smile-cat-smile.gif",
    "https://c.tenor.com/h5wYby96KJsAAAAd/cat-love-ahzix.gif",
    "https://c.tenor.com/dur8_lWhH2cAAAAC/crazy-cat-dancing-crazy-cat.gif",
    "https://c.tenor.com/ZhfMGWrmCTcAAAAC/cute-kitty-best-kitty.gif",
    "https://c.tenor.com/ujI068l1JL4AAAAC/sassy-cats.gif",
    "https://c.tenor.com/YjeDKHDpa6gAAAAd/cool-cat.gif",
    "https://c.tenor.com/4VY0Ykn4lN4AAAAd/cat-broken-cat.gif",
    "https://c.tenor.com/2T506UHvonMAAAAC/pirate-cat.gif",
    "https://c.tenor.com/oTeBa4EVepMAAAAC/business-cat-working.gif",
    "https://c.tenor.com/tMRY35MWfYYAAAAd/funny-silly.gif",
    "https://c.tenor.com/QAN9RxLUSxUAAAAC/cat-cute.gif",
]


@app.route("/")
def index():
    url = random.choice(images)
    return render_template("index.html", url=url)


if __name__ == "__main__":
    app.run(host="0.0.0.0")
To save the file, press ESC to exit ‘INSERT’ mode, then type :wq and press Enter. This will save and quit the file.
Computer Says No
If you experience a problem copying and pasting into the terminal on the Docker Playground you can use the Editor button to use a web-based text editor to edit your files.
You will now need to edit the remaining files with the following content:
requirements.txt
Flask==2.0.2
templates/index.html
<html>

<head>
    <style type="text/css">
        body {
            background: black;
            color: white;
        }

        div.container {
            max-width: 800px;
            margin: 100px auto;
            border: 20px solid white;
            padding: 10px;
            text-align: center;
        }

        h4 {
            text-transform: uppercase;
        }
    </style>
</head>

<body>
    <div class="container">
        <h4>Cat Gif of the day</h4>
        <img src="{{url}}" />
        <p><small>meow</small></p>
    </div>
</body>

</html>
You now have the makings of your web app. This could be run with python locally, however it is time to dockerize.
Write the Dockerfile
A Dockerfile is a text file that contains a list of commands that the Docker daemon calls while creating an image. The Dockerfile contains all the information that Docker needs to know to run the app — a base Docker image to run from, location of your project code, any dependencies it has, and what commands to run at start-up. It is a simple way to automate the image creation process.
Each Dockerfile starts by specifying a base image with the keyword FROM, this is what the container is going to be built from. The most common next step is to write the commands to copy and install all application dependencies, for this step you will use COPY, which copies the files into the image, and RUN, which executes a shell command. The next step in the image you are building is to expose a port so that you are able to connect to the web app from outside of the container, the command for this is EXPOSE. Finally, you will give the command, CMD, which will be executed by the container.
Copy the following into the Dockerfile:
# Base image
FROM python:3-alpine

# Install python and pip
RUN python -m pip install --upgrade pip

# Install Python modules needed by the Python app
COPY requirements.txt /usr/src/app/
RUN pip install -r /usr/src/app/requirements.txt

# Copy files required for the app to run
COPY app.py /usr/src/app/
COPY templates/index.html /usr/src/app/templates/

# Tell the port number the container should expose
EXPOSE 5000

# Run the application
CMD ["python", "/usr/src/app/app.py"]
Build your image
Now that you have your app files and Dockerfile, you can build your image. Fortunately, Docker makes this an easy process with a single command docker build. The -t flag is an optional command that allows you to add a tag name to your image. The fullstop that is following the tag name is a required argument which tells Docker where to look for your Dockerfile. By giving a fullstop as the value, we’re telling Docker that it can find the Dockerfile within the current directory. If our Dockerfile was stored in a different location or we had multiple Dockerfiles, we can change this fullstop and replace it with either the folder that contains the Dockerfile (e.g., folder/folder/) or the file path to the Dockerfile (e.g., folder/folder/Dockerfile).
docker build -t <DOCKERHUB USERNAME>/myfirstwebapp .
Have a close look at the output from that command, you should be able to identify each step in your Dockerfile being executed. Run docker images, you should see your image in this list.
Run your image
You have written your web app, written your Dockerfile, built your container image, now it is time to run it!
docker run -p 8888:5000 --name myfirstapp <DOCKERHUB USERNAME>/myfirstwebapp
You should see an output like this:
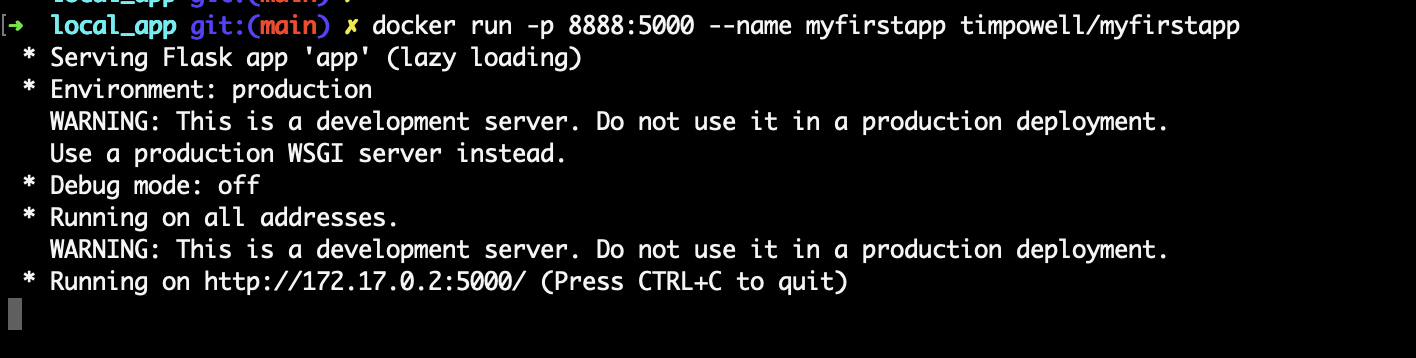
As you can see, your Flask web app is running on an IP address similar to 172.17.0.2:5000. If you type this into your browser to access your web app you will find that it does not work. That is because Flask does not know it is running in a container and has told you what IP address and port to access your web app from inside the container. As per the docker run command, you mapped the output of port 5000 from the container to localhost port 8888. If you’re following this workshop locally, your webapp should be available under localhost:8888. Alternatively, if you’re using ‘Play With Docker’, click ‘Open Port’ located at the top of the page and enter 8888 when prompted.
Congratulations! You have developed and deployed your first containerised web app!
Push your image
Now that you’ve created and tested your image, you can push it to DockerHub. First, login to your DockerHub account:
docker login
Not Again!
For the next part, if you didn’t tag your image properly during the docker build command, don’t fret! You can tag your image again using:
docker tag <LOCAL IMAGE NAME> <NEW TAG NAME>
Enter your username and password when prompted. Then all you need to do to upload your image to DockerHub is:
docker push <DOCKERHUB USERNAME>/myfirstwebapp
That’s it, you have published your first image to DockerHub! We will use this later on in the course. Now let’s clean up the container:
docker rm -f myfirstwebapp
Continued Learning
There is a lot of excellent material freely available for you to continue your learning with Docker. If you have a specific application in mind, it is worth investigating for tutorials and courses on that application. If you would like to continue on the Docker learning journey I recommend doing the official Docker 101 tutorial.